Thursday, December 29, 2011

Dinner by Candlelight

This card was chosen for the Top Talent Award at Our Creative Corner.

This Christmas I placed candles on the mantle and tables for an added bit of ambiance. What makes this different for me is the fact that I have been unable to do this because I have little grandchildren. I worry about open flames when there are little, quick fingers around. Battery operated candles to the rescue. The challenge this week at Our Creative Corner is to use a scene from your home for inspiration. The candles provided my inspiration.


This Iris Folded candle uses scraps of paper from my stash. 


Gold embossing powder was used for the greeting inside the Nestie banner. The banner edges were lined with a Marvy Gold Calligraphy pen, a glue pen then glitter. The halo effect around the pseudo flame was made with a glue pen and glitter.


The fern is a 'Punch Bunch' punch and the gold flourishes are from a MFT die. Glitter was applied to the pearls for an added bit of sparkle.

Back to creating cards in my Butterfly Garden.

Tuesday, December 27, 2011

Party Time

It's almost New Year's Eve and if you are having a party Print Candee is a great place to get some party supplies or digital images or paper packs or photo cards or scrapbooking images etc....one stop shopping!

Here is another great sketch designed by the multi-talented Melissa at Tuesday Morning Sketches.


This was a fun sketch and I hope you enjoy it as much as I did. Looking forward to seeing your creations.


This lovely label, from the Chic Label set, is one of the many labels that are offered at Print Candee. The floral paper strips are also part of the collection. The 'Life Defined' background stamp is from Whimsy Stamps, it was stamped with a gray ink pad then covered with a piece of vellum to achieve a more muted effect. All edges where distressed with Vintage Photo and my usual Marvy Gold Calligraphy pen. The gold flourishes were made with a MFT die.

Happy New Year to everyone! Stop by and wish the DT members a Happy New Year.


Back to creating cards in my Butterfly Garden.

Monday, December 26, 2011

Live, Dance, Laugh

This is my final week as the Guest Designer for Inky Antics. Thanks, Jackie for this wonderful opportunity, I've had a wonderful time designing samples with these great stamps.

In case you are on Christmas overload, here are a few "think spring" cards. It is never too early to "think spring" in snow country! This Brushed Calligraphy #2 set (11013SC) was a delight to work with.


The flower stamp was colored with markers, sprayed with a fine mist of water, stamped and then fussy cut. The flowers were foam mounted on the center panel which had been embossed with a Cuttlebug folder. The next card, using the same stamp set looks completely different.


On this window card the verse is stamped on the inside and the pearls are mounted on the acetate that forms the window. This flower was also done with markers but was sprayed with a 'perfect pearls and water' mix. The flower petals were highlighted with some Ultra fine glitter. The stick pin was made from jewels etc that were purchased at JoAnns.

Back to creating cards in my Butterfly Garden.

Tuesday, December 20, 2011

Sorry I Froggot

Welcome to the Tuesday Morning Sketches challenge #125. This weeks sponsor is Paper Pretties. They have a wonderful selection of stamps, digi images and ribbon. Sophia, Cooper, Zak and Lily are the cutest kid stamps around! 


This is my first ever sketch. After designing it and submitting it to Melissa, I sat down to make a card. There were many 'throw aways', many 'revisions' and many 'what was I thinking moments' before I finally created card. I am anxious to see how you interpret this sketch.

My two children were girls so now I am enjoying my grandsons. Boy oh boy what a difference! I just love this mischievous little kid. This 'Froggy Gift' stamp is from High Hopes. The DP is from Cloud 9 Design, embossing folder is Cuttlebug, and the word window punch is from Stampin' Up. The image was colored with Copic markers.

This is the last sketch before Christmas so please visit the DT members and wish them a Merry Christmas. They design for you each and every week so spread a little Christmas 'love' by leaving them a comment.


Back to creating cards in my Butterfly Garden.


Sunday, December 18, 2011

Snowman Soup

You don't really need Snowmen for this recipe but it sure did get your attention. Didn't it? (wink)

This is Week #3 of the the Sunday Stamping Series.  As the Guest Designer for December at the Inky Antics Blog, I had the privilege of using this fun stamp set to create a "Snowman Soup" (10936MC)...... All-in-one ..... gift and card. All I can say is 'yummy', 'yummy,' yummy'!


Don't you just love these adorable snowmen. I don't know about you but I'm always getting into "hot water" so I can relate to these cute guys!


The circles stamp from the set was used to create the background paper.  It was then covered with vellum that had been stamped in blue with the "Snowman Soup" stamp. The corners were punched with a Fiskar corner punch. The main image was colored with Prisma colored pencils, blended with Gamsol and then made into a "shaker." If you're counting....5 stamps were used on the front.


When you untie the ribbon, you'll find this delightful gift inside. Be sure to enlarge this photo so you can read the super cute poem. The hot chocolate with the stirring stick comes complete with instructions for making the 'soup'! Now how utterly adorable is that? The snowman lounging in the bowl with spoon in hand is sure to elicit smiles from anyone who sees it.  I used a cardboard CD literature holding folder to create this yummy gift. (more about the literature folder on the Inky Antics site)

No story can be completed without "The End" so here it is:


This makes a great "little something" gift. It is great to have a few of these made so you can have a "little something" for that unexpected guest or guests! 


Back to creating cards in my Butterfly Garden.

Friday, December 16, 2011

Christmas Favor Ornaments

Every Christmas I make favors for our dinner table. As the family gets larger there is less room on the table for these Christmas treats. This year I decided to make the favors into ornaments that hang on the tree. These ornament/favors helped fill up some of the blank spaces and added additional color and shimmer to the Christmas tree.


The papers are from a K & Co. Christmas pad which was full of the most beautiful shimmery papers. (lovely to look at but very hard to photograph)  Each cone was formed with a 6" square piece of paper. Martha Stewart and E K Success border punches were used on the top edges of the cones, Nesties provided the shapes that were used for the background for the 3D stickers. A ribbon bow, a few jingle bells and 3 small shaped punches (used as tags) were adhered to the front for added color.


The top part of the cone was lined with a gold foil doily. Each cone was filled with a piece of greenery, colorful berries, chocolate covered candy sticks, a piece of ribbon candy, a candy cane ornament and a pipe cleaner coil. (The pipe cleaner was used to close the bag that held the ribbon candy).  This cone will look beautiful on the tree even without the candy. (wink)


Wishing all my wonderful blog followers a very Merry Christmas and a healthy and Happy New Year.

Back to creating cards in my Butterfly Garden.

Tuesday, December 13, 2011

Sporty Penguins

Jackie asked me to design a card with this adorable stamp set for 'Try it Different Tuesday'. Are you ready for some fun?


OK visualize this a "penguin on ice skates"....Scotty Hamilton watch out you have competition! Oh my goodness this 'Sporty Penguin' (11004MC) set is just adorable. Inky Antics has done it again...they made me smile!


I couldn't resist giving this little guy a frozen pond to ice skate on! A torn piece of paper towel (used as a stencil) and a stencil brush was used to create the sky, torn green cardstock created trees which were embossed with a Cuttlebug embossing folder. To create the faux snow a piece of white CS was torn, embossed, then highlighted with Prisma colored pencils and Ultra fine glitter. A few snowflakes (included in the set) were stamped on the ice using white Stazon. The penguin was colored with Prisma colored pencils and Gamsol and foam mounted to the card.


The 'Merry Christmas' sentiment was hand written on the inside of the card. The ideas was to make it appear as tough the penguin skated the words on the ice.


The other penguin in the set was added to the inside of the card for a bit of color. Since this little guy got second billing, I only thought it was fair to make him a star on the front of a card.


The snowflakes were stamped with Versamark then embossed with Winter Wonderland embossing powder. This adorable guy was also colored with Prisma colored pencils and Gamsol. The die cuts are from Spellbinders. The block of ice was covered with Glossy Accents and some glitter.

Everyone should have as much fun as I have had being the December Guest Designer for Inky Antics. These adorable penguins make winter a little more tolerable.

Back to creating cards in my Butterfly Garden.

Home for the Holidays

As Christmas approaches take time to remember all those who won't be home for the Holidays.

Tuesday Morning Sketches has a wonderful  'judged' challenge. This week we are using lovely sketch that was designed by the very talented Melissa.


Now for the added twist for this 'judged challenge', you must incorporate 3 items from the bingo card . Three  in a row either up & down, side to side or diagonally. Can't wait to see what you create. Enjoy!


I love the beautifully decorated homes at this time of the year. The lights seem to glisten off of the snow. I always admire the homes that simply showcase their front door. I saw this digi "Steps Christmas" image at Bugaboo Stamps and it reminded me of the lovely front doors in the area.


I chose the center row side to side for my 'bingo'  Glitter * Pattern Paper * Embossing. The patterned paper is from a K & Co. Christmas pad and embossing powder is Stampendous.


I used acrylic paint to add a little texture to the faux snow, then applied ultra fine glitter over the top.

Keeping in the Christmas spirit...please stop by and wish the DT a wonderful Christmas. They love comments as much as you do!


Back to creating cards in my Butterfly Garden.

Sunday, December 11, 2011

Holiday Reindeer

Welcome back for Week 2 of the Sunday Stamping Series. Thanks for following along on this delightful journey.

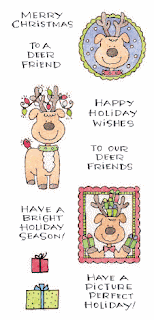
Holidays should be FUN and this 'Holiday Reindeer' (10912LC) stamp set from Inky Antics definitely fits the bill. The cute little reindeer is all decked out in his finest Christmas lights.


I'm not sure if the reindeer added the lights to his antlers or if he just got caught in the tree decorating. The reindeer and the presents were colored with Prisma colored pencils and Gamsol then fussy cut and foam mounted to the card. The remaining shapes are Spellbinders dies, edger is from EK Success.


The next card is the exact layout but it has been made into a side step card.


The side step card is bulkier so I made a box/envelope to accommodate the additional width. This is the front of the holder and the stamps are also from the 'Holiday Reindeer' clear stamp set and the shapes are Sizzix and Spellbinders.


This is the back and side of the holder, so you can see the width of the box/envelope.


Hope you enjoyed these cards as much as I enjoyed making them as the December Guest Designer at Inky Antics. Which card is your favorite?

If your looking for a versital stamp set, this is the set to add to your collection. Once again I love the delightful 'play on words'......have a Merry Christmas my 'deer' friends!


Back to creating Cards in my Butterfly Garden.

Wednesday, December 07, 2011

CR84FN44

Can't believe that this is the last CR84FN challenge of the year.  It has been a lot of fun creating cards this past year. Mona and Design Team have inspired me each and every week. Thanks, ladies and I wish you all a very Merry Christmas and a happy and healthy New Year.  Look forward to seeing you again in January.

I decided to ink up one of my unused Tina Wenke stamps. Just love her style wether it be with mice, hedgehogs or sweet little girls, her stamps always capture my heart.


The background was stamped with a Hero Arts stamp then highlighted with a Sakura clear stardust pen. The image was colored with Copic markers.  A glue pen was used on the edges of the Nestie shapes and then they were dipped into Ultra fine glitter. The flowers and rhinestones are from Michael's, the ribbon is from Hobby Lobby and the corner punch is Martha Stewart.

This is the inspirational photo that was used to create this card.


Back to creating cards in my Butterfly Garden.

Tuesday, December 06, 2011

Reindeer Crunch

No this doesn't mean "crunch" the reindeer! This refers to a tasty treat! The recipe is even included with the Reindeer Crunch (10941SC) stamp set.  I am still full from our Thanksgiving extravaganza so.....I opted to make something other than a food type item.


Red and green are the traditional Christmas colors but I'm experimenting with different color combos. For this Christmas card, pink, teal and white were my chosen colors.  The pink cardstock was embossed with an embossing folder, Versamark was applied (direct to paper) over the raised images which were then embossed with Winter Wonderland embossing powder. The white areas were stamped with the background stamp (included in the set) then lightly misted with a Perfect Pearls and water mixture. The delightful deer was colored with Prisma colored pencils and Gamsol. The verse is from the Holiday Reindeer (10912LC) clear set. A few rhinestones, left over fun fur (remember those scarves that were all the rage a few years ago?) and some faux snowflakes (that's the only kind of snow I like!) were added for a bit of pizazz.

This next photo showcases some special Reindeer tags for those 'special' people in your life....you know who these people are....the ones who keep every card, tag, gift you have ever made for them.


The middle card on the left hand side is stamped on 'kraft' cardstock. This is my new favorite technique...I love trying different coloring mediums on 'Kraft' CS.  I really liked the the way the reindeer looked on the Kraft CS, so I stamped more deer and fussy cut them for 4 other tags. The two tags in the center were not stamped on 'Kraft' CS. Raffia, gold leaves and a flourish, buttons and snowflakes were added to a few tags for a more masculine look. Flowers and bows aren't a favorite of the men in my life! There are close-up photos of each tag HERE.


I hope you are enjoying my Guest Designer creations...I've had a wonderful time designing cards and gift items with these interchangeable stamp sets. 

This is the Reindeer Crunch set.


I put Scotch tape over the "to & from" on the tag stamp, inked  up the stamp, removed the tape, stamped the image and voile....like magic! the tag was stamped without "to & from".  Since the stamps are clear it was very easy to align the "To a Deer Friend" (Holiday Reindeer Set) in the center of the stamped tag image.

This is the Holiday Reindeer Clear Set.

You'll see more with the Holiday Reindeer set next Sunday, so I look forward to seeing you on Sunday.


Back to creating cards in my Butterfly Garden.


Christmas Tree Ornaments

I remember the lovely glass ornaments that decorated our Christmas tree when I was a child. The tree lights would glisten off of these ornaments casting a thousand little lights everywhere.  When we were putting these ornaments on the tree we had to be very careful because they were oh so fragile.  When I saw the beautiful digi ornaments on the Tiffany Doodles site, I knew I had to color my version of Christmases past. I used the lovely sketch from Tuesday Morning Sketches to showcase my ornaments.


Two images of each ornament were used for my nostalgic tree. The images were colored with Copic markers.


Each ornament was fussy cut into two separate pieces. One piece was covered with Glossy Accents and the remaining piece was covered with Ultra Fine Glitter. Fine gold thread was braided to make the gold hangers for the ornaments. The tree branch was created with three different shades of green CS using a "Punch Bunch" punch. (say that three times fast) Ha!


The ornaments were decorated with rhinestones and then adhered with foam mounting tape.

Please stop by and wish each member of the Design Team a Merry Christmas (tis the season!) and while you are there......they could use some Christmas Love for all of the inspiration that they provide each and every week.

Back to creating cards in my Butterfly Garden.

Sunday, December 04, 2011

Introducing Sunday Stamping Series....."Inky" Style

I am so honored to help Jackie kick off a new series this month on the Inky Antics Blog. Every month Jackie will feature a different Guest Designer whose projects will be posted every Sunday. If you want different ideas for using your Inky Antics Stamps...this is the place to visit for inspiration. Be sure to visit the Inky Blog regularly. BTW there is a  'blog candy' giveaway. YEAH!!!

The 'Snow Birdies' clear stamp set is featured this week on the blog. I know what you're thinking..."how adorable"...yup, you're right "utterly adorable".


 Here are two different examples of fun things to make with this delightful set.


This little 'sweet tweets' candy cane box was made with clear cardstock which can be found HERE. It was stamped with White Stazon and then colored on the back side with Sharpie markers. The cute birdie was colored with Prisma colored pencils, blended with Gamsol and foam mounted to the belly band which was also stamped with White Stazon. White flocking was used on the brim of the hat, pom pom and on the ice skates. The tutorial for making the box is on the Inky blog.

Here is a closer view of the colored images.


Since the birdie was holding a candy cane I thought it was appropriate that the box be filled with candy cane 'tweets'. Of course there are other candies that could be used. There is even a Hershey Kiss type image included in this set. So if you are a chocoholic.......this is right up your alley! :-) You could fill the box with Hershey Kisses.

The other Snow Birdie stamp was used to create a 'Season's tweetings' card. Don't you just love the 'play' on words? (wink) FYI all birdies don't have to be colored 'blue'.  This cutie is more like a robin but you could also do a canary.


The background was made by randomly stamping the floral images (included in the set) onto dark green card stock. This birdie was also colored with Prisma colored pencils and Gamsol. The note punch was found at the Dollar Tree...never know when you might find a treasure there. A glue pen and Ultra fine glitter were added for a little 'bling'. There are 9 stamps in this set so there are lots of possibilities.

I hope you have enjoyed my Guest Designer creations as much as I have enjoyed creating them. Inky Antics Stamps always make me SMILE. :-)

Back to creating cards in my Butterfly Garden.